
Table of Contents
A mom walked into the shop last October with her daughter in tow, phone already open to a TikTok video. “Can you do this?” Tiny elastics, woven into a perfect radiating web across the scalp. Honestly? I’d never attempted it before that exact moment. Took me about ten minutes of staring at the video, pausing, rewinding, before the logic clicked. Turns out it’s way simpler than it looks once you see the pattern underneath it.
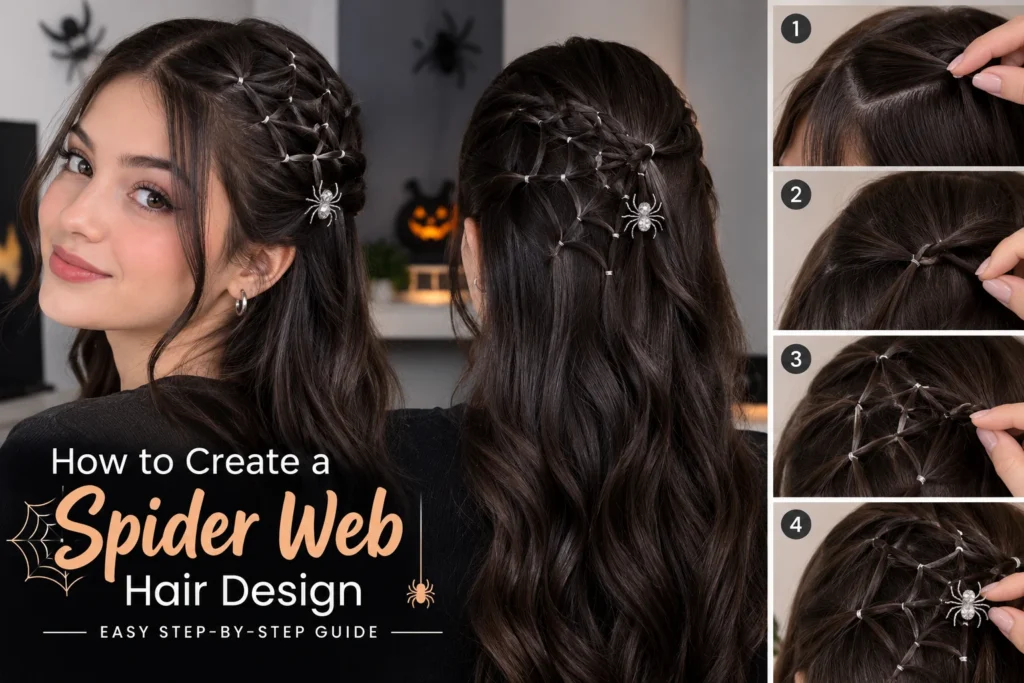
That’s really the whole appeal of this one. It looks intricate enough to stop someone mid-sentence at a Halloween party. But the actual technique? Small sections, elastics, a pattern. That’s it. No years of training required, no salon chair, nothing you can’t do sitting cross-legged on your bathroom floor. So here’s exactly how to create a spider web hair design at home, step by step.
What You’ll Need Before You Start
- A rat-tail comb for clean, precise parting
- Small, thin hair elastics, at least 15 to 20 depending on how big you want the web
- Hair clips to hold sections out of the way while you work
- A fine-tooth comb or brush for smoothing each section
- Optional: a small plastic spider or temporary black hair color spray to finish the look
Brush everything out completely first. Skip this step, and you’ll be fighting tangles halfway through sectioning; trust me, it’s not worth the shortcut.
Method 1: The Elastic Web Technique (Easiest Way)
This is what most people actually mean when they ask how to create a spider web hair design, and it’s genuinely the easier of the two methods here. Work on one side of the head or just at the crown for your first go. Don’t try to cover the whole head, that’s a second-attempt project, not a first one.
Step-by-Step Instructions
1. Pick your starting point. Just above one ear or right at the crown both work fine for a first try.
2. Part a small circular section there, about the size of a coin, and secure it with a tiny elastic close to the scalp. This is your center.
3. Section the hair around that first elastic into four to six even triangle-shaped pieces, radiating out like slices of a pie.
4. Take the first radiating section, place a small elastic a short distance from the center, close to the scalp, as a spoke on a wheel.
5. Repeat on every other section, same distance each time, until you’ve got a full ring of elastics forming the first circle.
6. Add a second ring further out, same rule, keep it even. Two or three rings is plenty for a convincing web.
7. Smooth any loose strands between the elastics with a fine-tooth comb. This step is what actually sells the illusion; don’t skip it.
8. Add a small plastic spider somewhere near the edge or center, mist with hairspray, done.
Here’s the thing nobody tells you until you’ve already messed it up once: keep your sections thin. Thick sections make the whole thing look chunky instead of delicate. Thin and even is what separates a web that looks deliberate from one that looks like you gave up halfway.
Method 2: Braided Web with a Decorative Spider Accessory
If twenty elastics against your scalp sounds like more than you signed up for, there’s an easier way that still lands the same effect. This one leans more on braiding technique than precise sectioning, so if you’ve ever practiced any kind of circular or crown braid before, you’re already halfway there.
1. Section a circular piece of hair at the crown, like you’re building a bun base, and French braid it into a continuous ring shape.
2. Pin the braided ring flat against the head with bobby pins.
3. Lay a web pattern inside the ring, a store-bought fake web prop works fine, or weave thin black thread or a pipe cleaner across the open circle yourself.
4. Tuck the ends of whatever you used underneath the braid so nothing pokes out or digs in.
5. Clip a small plastic spider onto the web so it looks like it’s mid-crawl.
This version forgives a lot more than the elastic method does. If braiding is already something you’re comfortable with, our braids and cornrows guide covers a few circular and crown braid techniques that make this version even cleaner.
How Big Should Your Web Actually Be?
Every single time someone asks me how to create a spider web hair design, this is the next question. And the honest answer is: it depends on how much hair you’ve got and how loud you want the final look.
- Small accent web: one or two rings, palm-sized, near the hairline or above one ear. Quick, subtle, forgiving for a first attempt.
- Medium statement web: three rings, about the size of your open hand, centered at the crown. Most people land here; it’s noticeable without eating the whole head.
- Full dramatic web: four-plus rings covering most of one side. Takes real patience. Don’t attempt this one until you’ve nailed the smaller sizes first.
Start small. Always. It’s a five-second job to add another ring once your spacing is already working; it’s a much bigger headache to undo a web that’s gotten too big and gone lopsided on you. I learned that one the hard way on my second attempt; I ended up redoing the whole outer ring from scratch.
Tips for Different Hair Types and Lengths
- Short hair: fewer rings, two usually reads better than three since there’s less length to connect everything visually.
- Long, straight hair: the elastic method genuinely shines here; it lies flat, and the pattern stays crisp all night.
- Curly or coily hair: stretch each section gently before the elastic goes in; otherwise, your natural curl pattern can swallow the web shape whole.
- Kids’ hair: bigger sections, fewer of them. Small, precise elastics need more patience than most kids have in them, and a slightly bigger web still reads fine from across the room.
Common Mistakes to Avoid
Uneven spacing is the big one. If your rings drift even slightly off-center, the whole thing reads as lopsided rather than intentional. Take the extra minute to actually eyeball distances before committing each elastic.
Pulling elastics too tight is the second. This sits on your scalp for hours, sometimes a full night out. Too tight and you’ve got a headache by nine PM. Snug holds the shape just fine; you don’t need it painful.
Skipping the smoothing step is the third, and it’s the one people skip most because it feels optional. It’s not. Loose, frizzy bits between your elastics turn a clean web into a messy one in seconds, and it’s the fastest fix on this entire list; thirty extra seconds with a comb genuinely changes the finished look.
Troubleshooting: When It’s Not Coming Out Right
Tried everything above and it still looks off? It’s almost always one of three things.
Your center point started too big. A chunky first section throws off every ring that follows since you’re measuring from an uneven base. Go back, make it genuinely coin-sized, not a quarter of your head.
Your rings aren’t actually circular. Easy mistake, especially on the side you can’t see straight-on in the mirror. Grab a hand mirror and check the back and sides before locking in your final rings.
Your elastics don’t match. Mixing sizes or colors mid-design throws off the whole illusion more than you’d expect. Keep them consistent unless a mixed, multicolored look is the actual goal.
How to Take It Out Without Damaging Your Hair
- Never yank elastics straight out; that’s unnecessary breakage you’re choosing for yourself.
- Use small, blunt-tipped scissors to snip anything tangled rather than forcing it loose.
- Work outer rings inward, one elastic at a time, not several at once.
- Finish with a wide-tooth comb and a leave-in conditioner to smooth out whatever texture the sectioning left behind.
Fun Variations to Try
- Glow-in-the-dark elastics for a party that runs late.
- Metallic or glitter elastics instead of plain black for something glossier and less traditional.
- A double web, one on each side, for a more symmetrical statement.
- Temporary colored hair spray underneath so the web shows up against a completely different base color.
Short Hair? You’ve Still Got Options
If your hair’s already on the shorter side, don’t assume this design is off the table; a smaller, tighter web actually reads cleaner on short lengths than a big sprawling one would. Our pixie bob haircut guide has some base styling tips that pair nicely here; less overall hair to manage means the elastic sections stay neater for longer.
What Most Spider Web Hair Tutorials Skip
A lot of the tutorials out there just show the finished result, with no real explanation of why each step matters. Which is exactly why so many first attempts come out uneven.
Spacing consistency barely gets mentioned. Most videos move too fast to actually show how far apart each elastic sits, and that spacing is the single biggest factor between clean and sloppy.
Hair type adjustments get skipped almost entirely too. A method that looks effortless on straight hair needs real tweaks for curly or coily textures, and most guides just pretend one approach fits every head the same.
And nobody talks about comfort. Wearing twenty small elastics for a quick photo is nothing like wearing them for a full night out. If you’re keeping this in for hours, go snugger than you think you need to, right from the first elastic.
Frequently Asked Questions
What’s the simplest way to create a spider web hair design?
One or two rings around a single center point; skip the multi-ring version entirely. Takes a fraction of the time and still reads clearly as a spider web from normal viewing distance.
Is there an easy way to create a spider web hair design for beginners?
Go with the braided web and spider accessory method instead of elastics for your first attempt. It needs way less precision and still gets you a convincing Halloween look.
What’s the full step-by-step process to create a spider web hair design?
Section a center point, secure it, divide the surrounding hair into even radiating sections, then add elastics at consistent distances outward to build rings. Smooth loose strands between rings, finish with a spider accessory. The breakdown further up covers every stage in detail.
What’s a good spider web hair design for a boy?
A simplified two-ring web at the crown or above one ear, with slightly bigger sections than you’d use on longer hair. There’s less length to work with, so bigger, simpler sections just make more sense.
Final Thoughts
Once the logic clicks- center point, even radiating sections, consistent ring spacing- you’ll pull this off in under twenty minutes, even your first real attempt. Practice it once before the actual party if you’ve got the time, so you’re not troubleshooting spacing with trick-or-treaters already knocking.
Whichever method you go with, elastics or the braided ring, it’s the finishing touches that actually sell it. A tiny plastic spider. A bit of texturizing spray. Clean, even sections all the way through. Nail those, and you’ve got a Halloween hairstyle that looks far harder than it actually was to make, and honestly, that’s half the fun of wearing it out the door.